
Asset List
Open in NocthinkModule: Asset Management · URL: /asset-management · Responsible role: IT / Asset Officer · Also used by: Owner/Director (full), Procurement (write — create/update), General Affairs and finance roles (read)
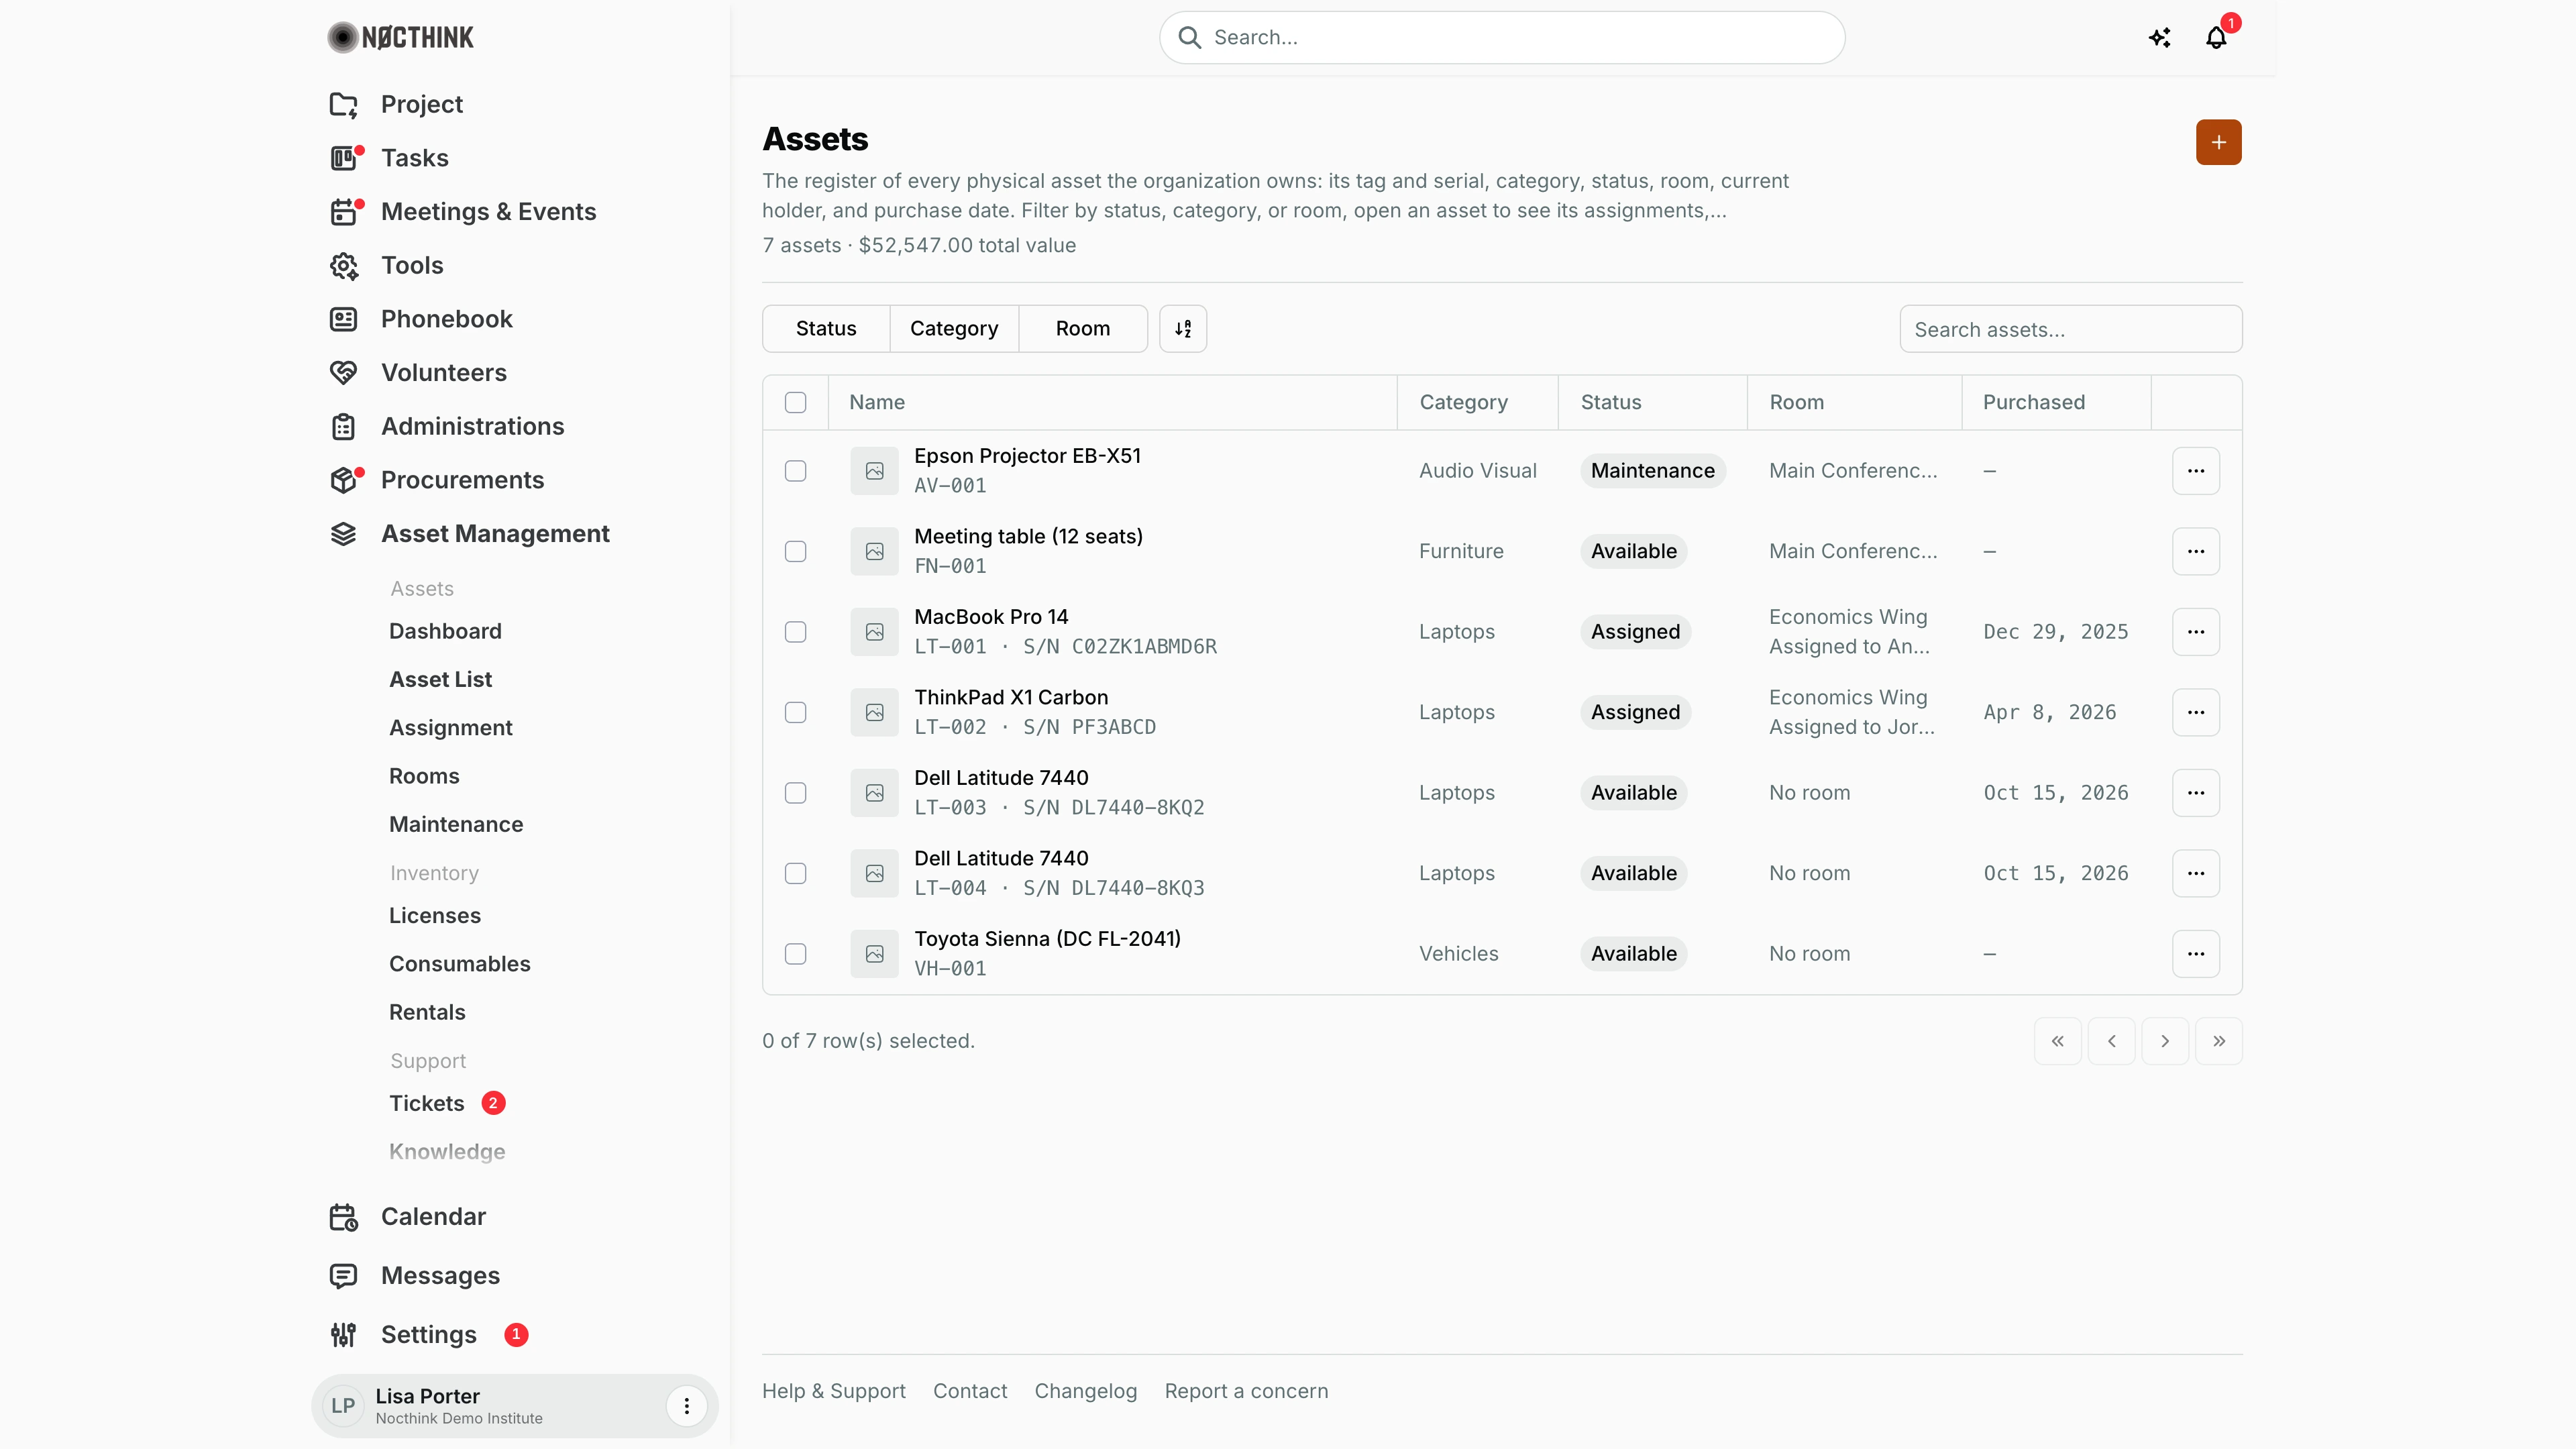
Screenshot: Lisa Porter (Operations Officer), Nocthink Demo Institute demo data.
Why I use this page
This is the asset register: every physical item the organization owns, with its tag, serial number, category, status, room, current holder, and purchase date. I register new equipment here when it arrives, correct records when something moves or is retired, and print QR labels for new stock. I open it several times a week, and every time a goods receipt brings in equipment.
What's on the screen
- Header: title Assets, a description, and a summary line ("7 assets · $52,547.00 total value" — count and sum of purchase prices, in the organization's base currency). The + button at the top right ("New asset") opens the New asset form.
- Toolbar: filter buttons Status (Available, Assigned, Maintenance, Retired, Lost), Category (from the categories set up in Settings), and Room (active rooms only), a column/sort control, and Search assets... on the right (searches the name).
- Table columns:
- Checkbox for selecting rows.
- Name — photo thumbnail (or placeholder), asset name, and underneath the asset tag and "S/N" serial number if recorded. Sortable.
- Category.
- Status — a neutral pill; only Lost is shown in red.
- Room — room name or "No room", and "Assigned to <name> (<employee no.>)" when someone holds it. Long names are cut off with "…" on a laptop-width screen.
- Purchased — purchase date (e.g. "Oct 15, 2026"), or "—". Sortable.
- ⋯ row menu — View, Edit, Delete.
- Footer: "0 of 7 row(s) selected." and pagination arrows. Selecting rows shows bulk buttons Generate QR (n) and Delete (n).
How I …
How I register a new asset
- Click + (New asset).
- Under Identity, fill Name, Asset tag (e.g. AST-0001; must be unique), Serial number, and pick a Category.
- Under Status and location, choose Status (Available, Assigned, Maintenance, Retired, Lost) and Location (the building/site).
- Under Purchase, optionally enter Purchase date and Purchase price (a number, not negative).
- Add a Description (condition, quirks) if useful.
- Click Create asset (see New asset below). Errors such as "An asset with this tag already exists." appear on the form.
- Equipment that arrived through procurement can instead be created from the goods receipt (Generate → Generate assets), which links the asset to its PO and receipt.
- To put it in a room, upload a photo, add the vendor or warranty date, open it again and use Edit (these fields are only on the edit form).
How I update an asset's details, room, or status
- Open the row menu ⋯ → Edit (or open the asset and click Edit; see Edit asset below).
- Change fields in Photo, Identity, Where it is (Room, Location, Status), Purchase (Vendor, Purchased, Price, Warranty until), or Description.
- Picking a Room sets the Location to that room's site automatically.
- A new photo is saved as soon as it is uploaded (JPG or PNG, up to 8MB); everything else saves when I click Save changes (Cancel discards).
How I look at an asset's history and documents
- Click the asset name or choose ⋯ → View (see Asset detail below).
- The left rail shows Asset details (photo, status, warranty, purchase info). The tabs show Overview (Description, Specifications), Assignments, Maintenance, Tickets, Procurements (linked source documents and invoices), and Documents.
- On Documents, upload a file with Type (Manual, Guarantee / warranty card, Invoice, Receipt, Other), File, Title, and Notes.
- From the ⋯ menu on the detail page I can Generate QR code or Delete asset.
How I print QR labels
- Tick the checkboxes of the assets (or the header checkbox for the page).
- Click Generate QR (n). A dialog shows one label per asset, sized for 38×13 mm stickers on an A4 sheet.
- Click Print, and use the browser print dialog. Close when done.
How I find assets quickly
- Use Status, Category, or Room to narrow the list; combine them as needed.
- Type in Search assets... to match by name.
Detail page, forms & dialogs
Asset detail
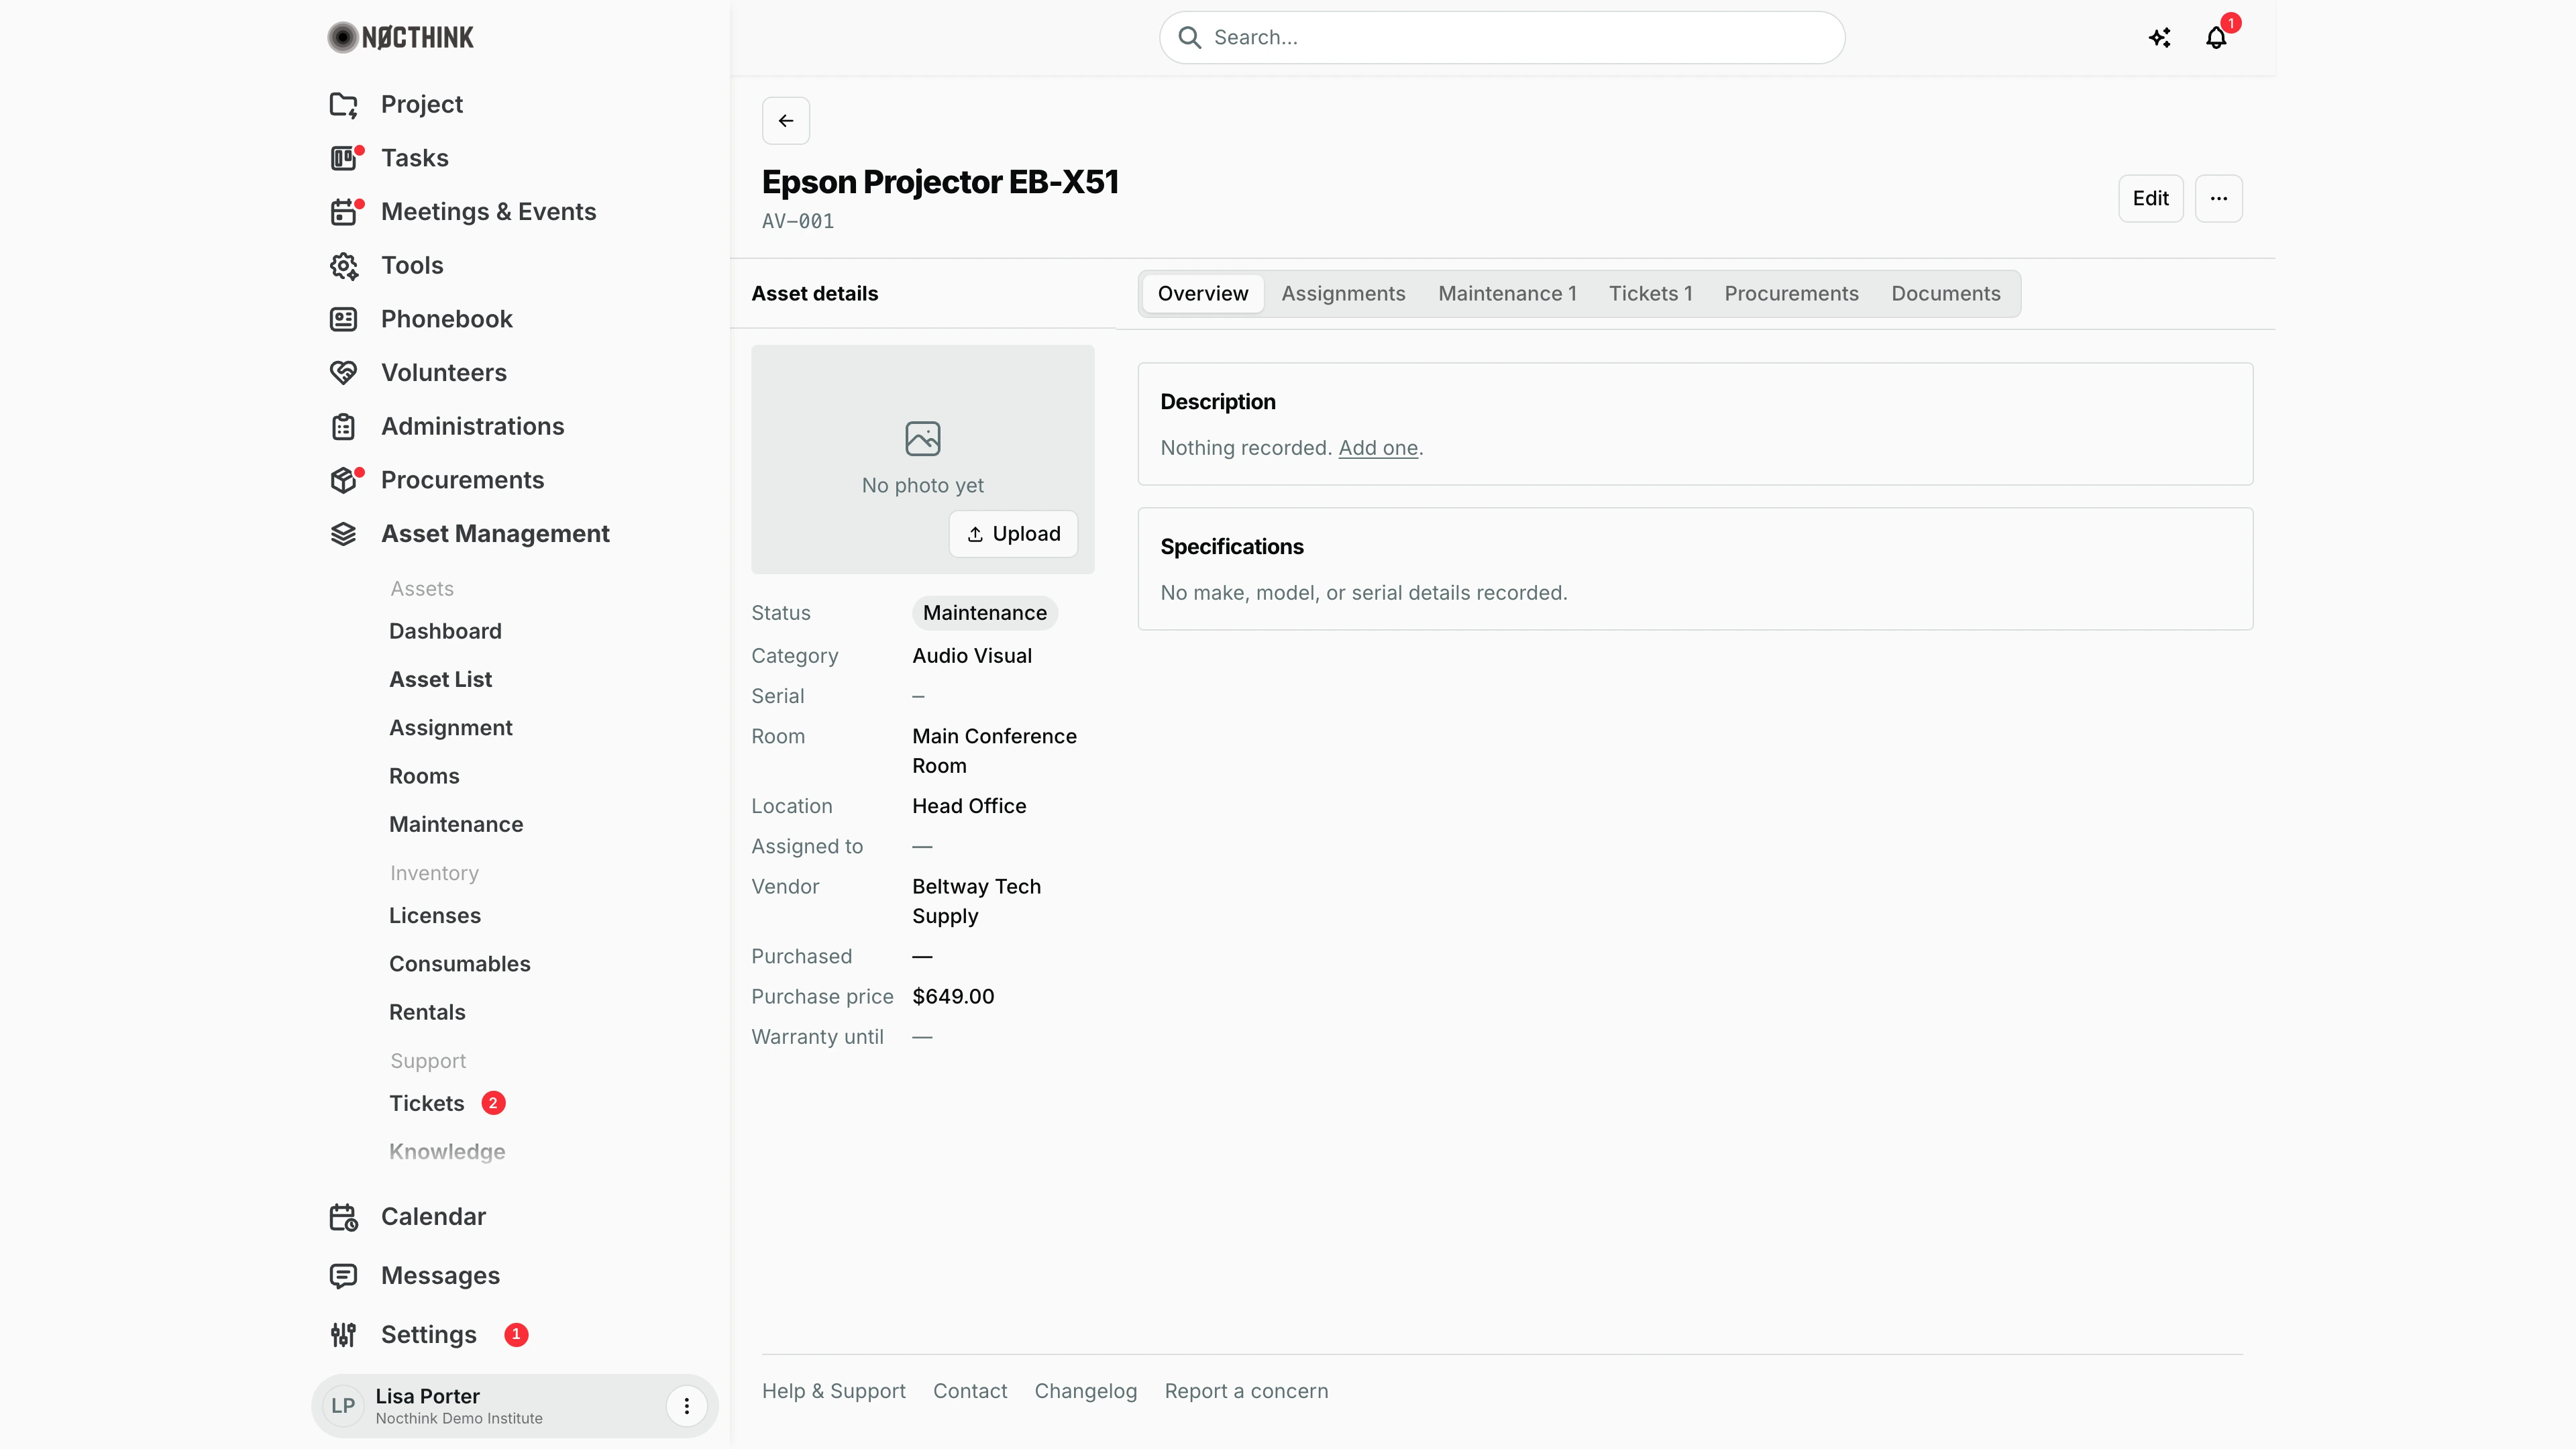
Screenshot: Lisa Porter (Operations Officer), Nocthink Demo Institute demo data.
Clicking an asset name opens its page. The header shows the asset name and asset tag, an Edit button and a ⋯ menu with Generate QR code and Delete asset.
The left rail, Asset details, starts with the photo panel (No photo yet and Upload until a photo is added; a new photo saves immediately), then Status, Category, Serial, Room, Location, Assigned to, Vendor, Purchased, Purchase price and Warranty until.
The tabs on the right are Overview, Assignments, Maintenance, Tickets, Procurements and Documents; a tab shows a count when it has records. Overview holds Description ("Nothing recorded. Add one." links to the edit form) and Specifications (make, model, serial and other details, or "No make, model, or serial details recorded."). Assignments lists the custody history and reads "No assignments" when nobody holds the asset. Procurements links the Vendor, Purchase Order and Goods Receipt the asset came from, plus its invoices.
Asset detail — Maintenance tab
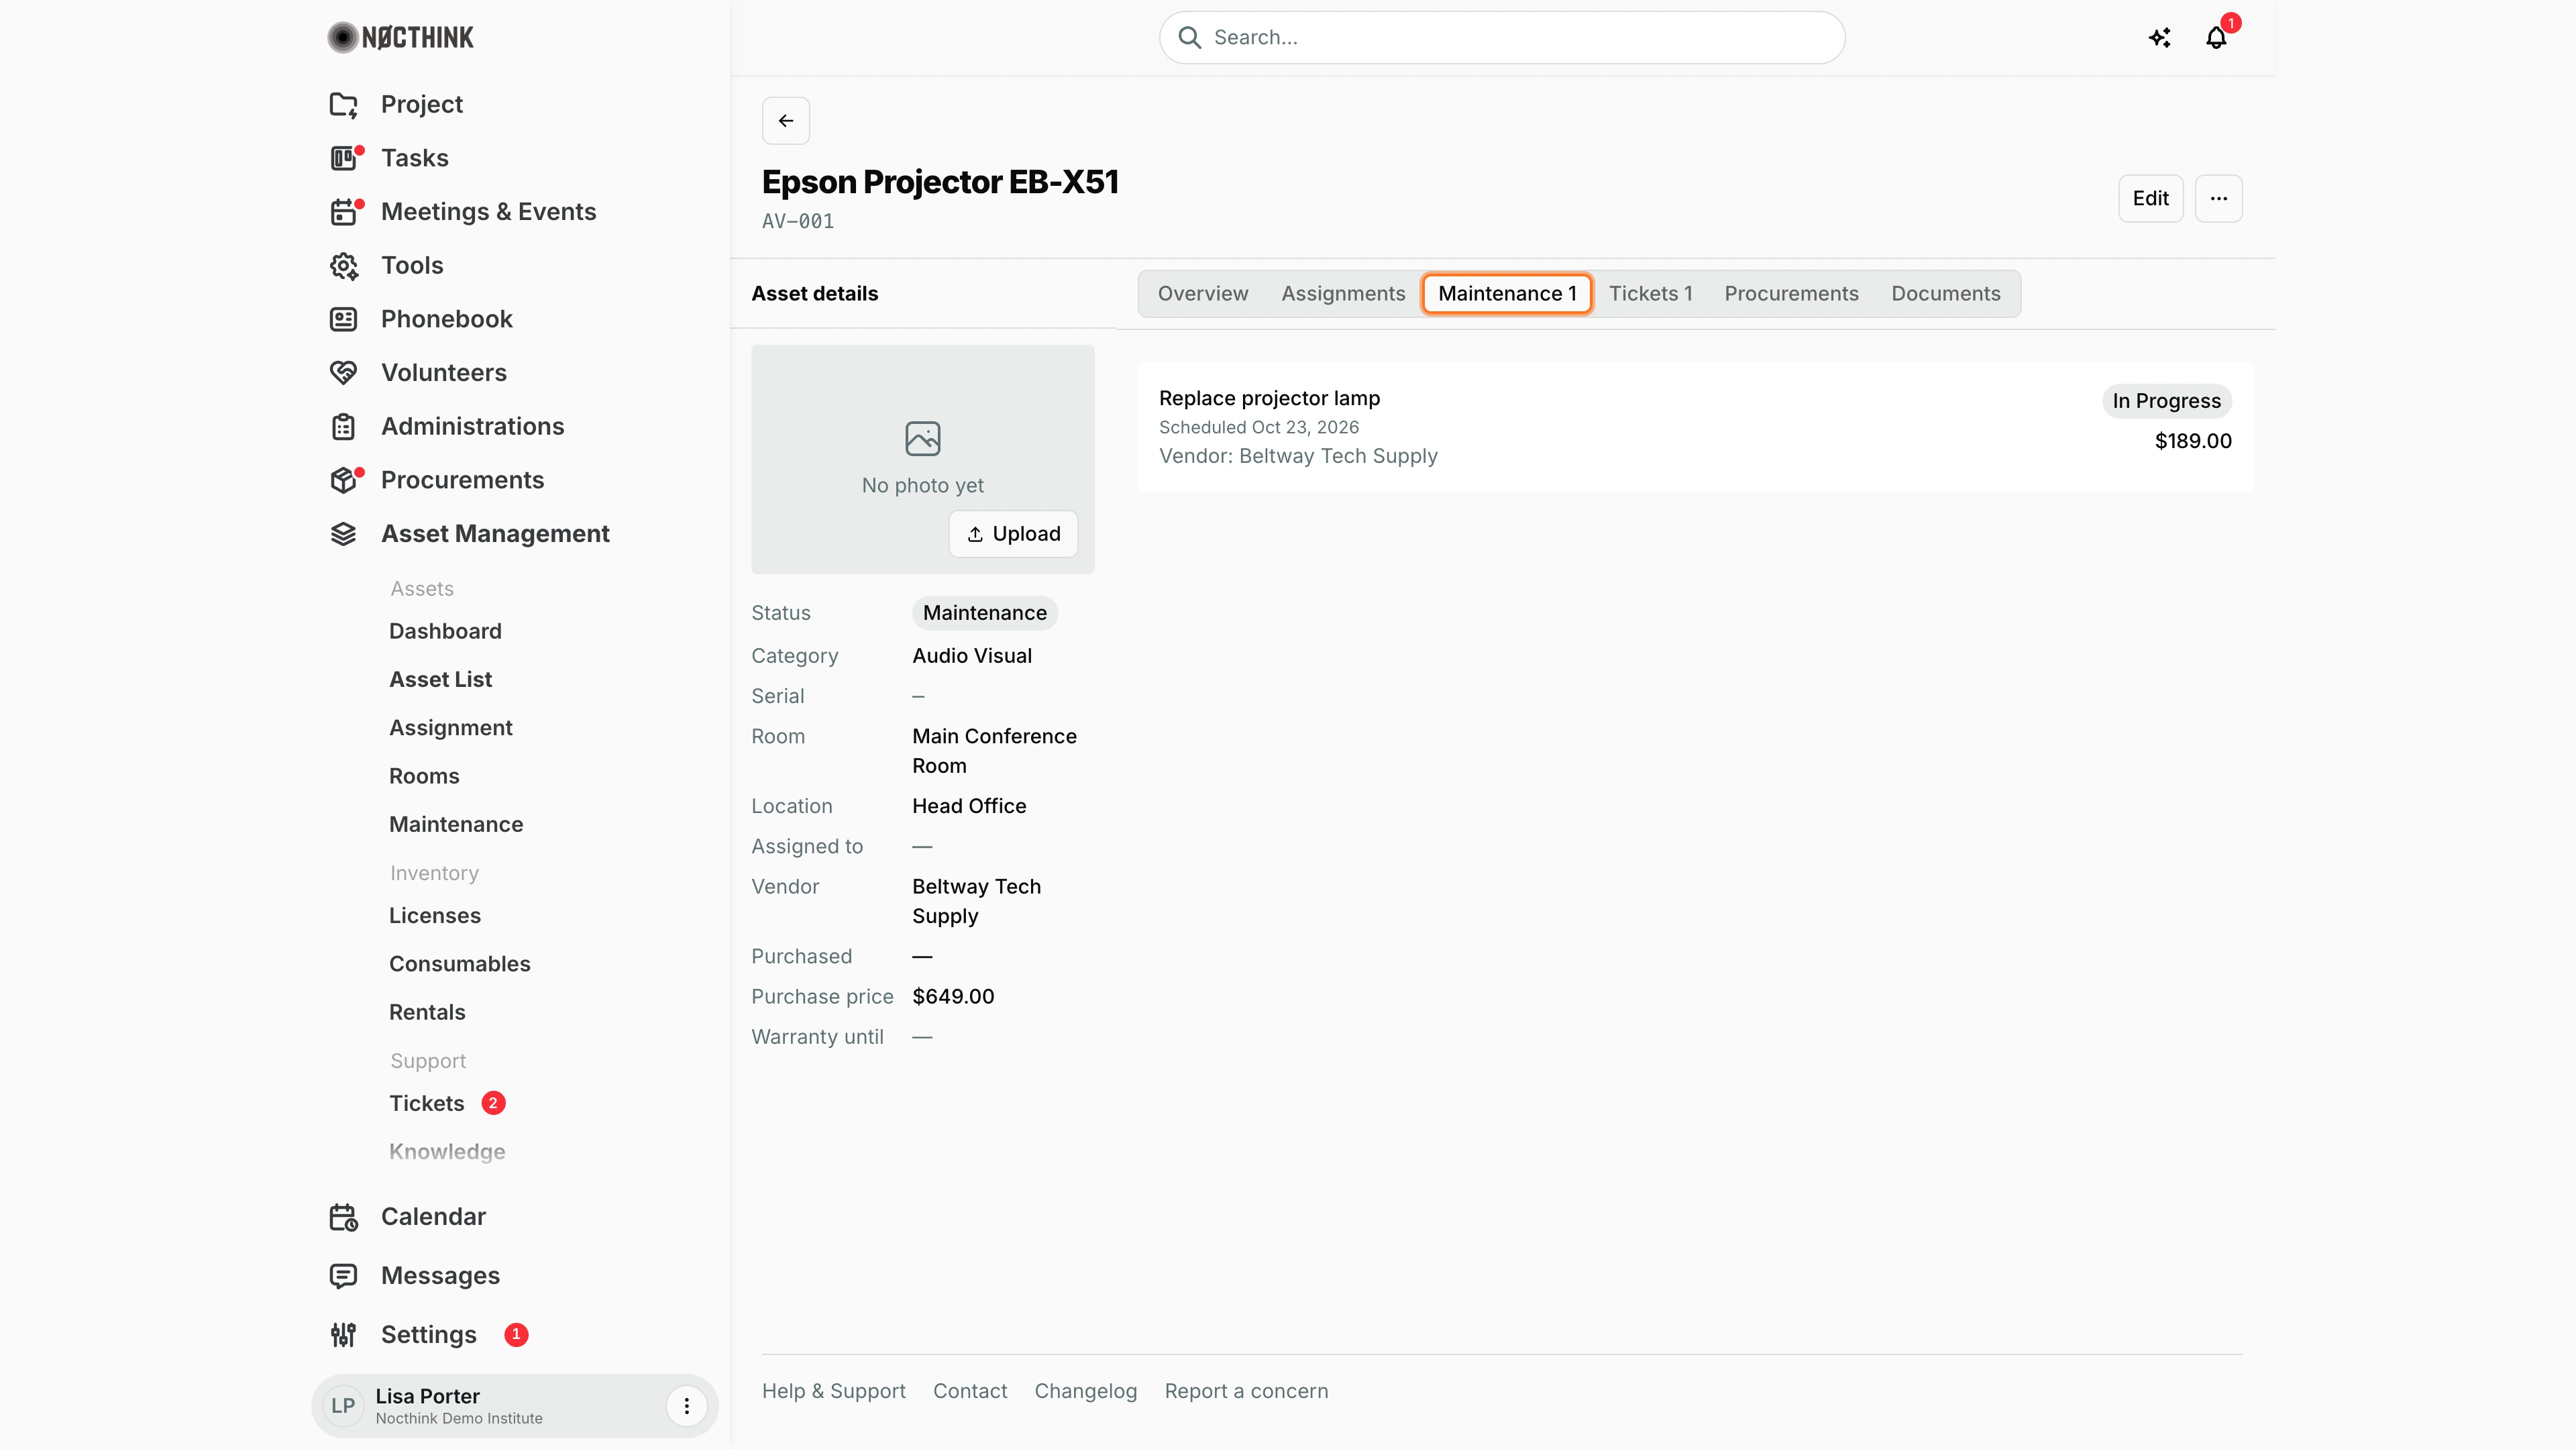
Screenshot: Lisa Porter (Operations Officer), Nocthink Demo Institute demo data.
The Maintenance tab lists every maintenance job logged against this asset: the title, the scheduled date, the vendor, a status pill (Scheduled, In Progress, Completed, Cancelled) and the cost. Here the projector has one job, "Replace projector lamp", in progress at $189.00, which is why the asset's status in the left rail is Maintenance.
The tab is read-only. To add or change a job I go to Maintenance; the asset's own status is changed separately with Edit. With no jobs the tab shows "No maintenance yet".
Asset detail — Tickets tab
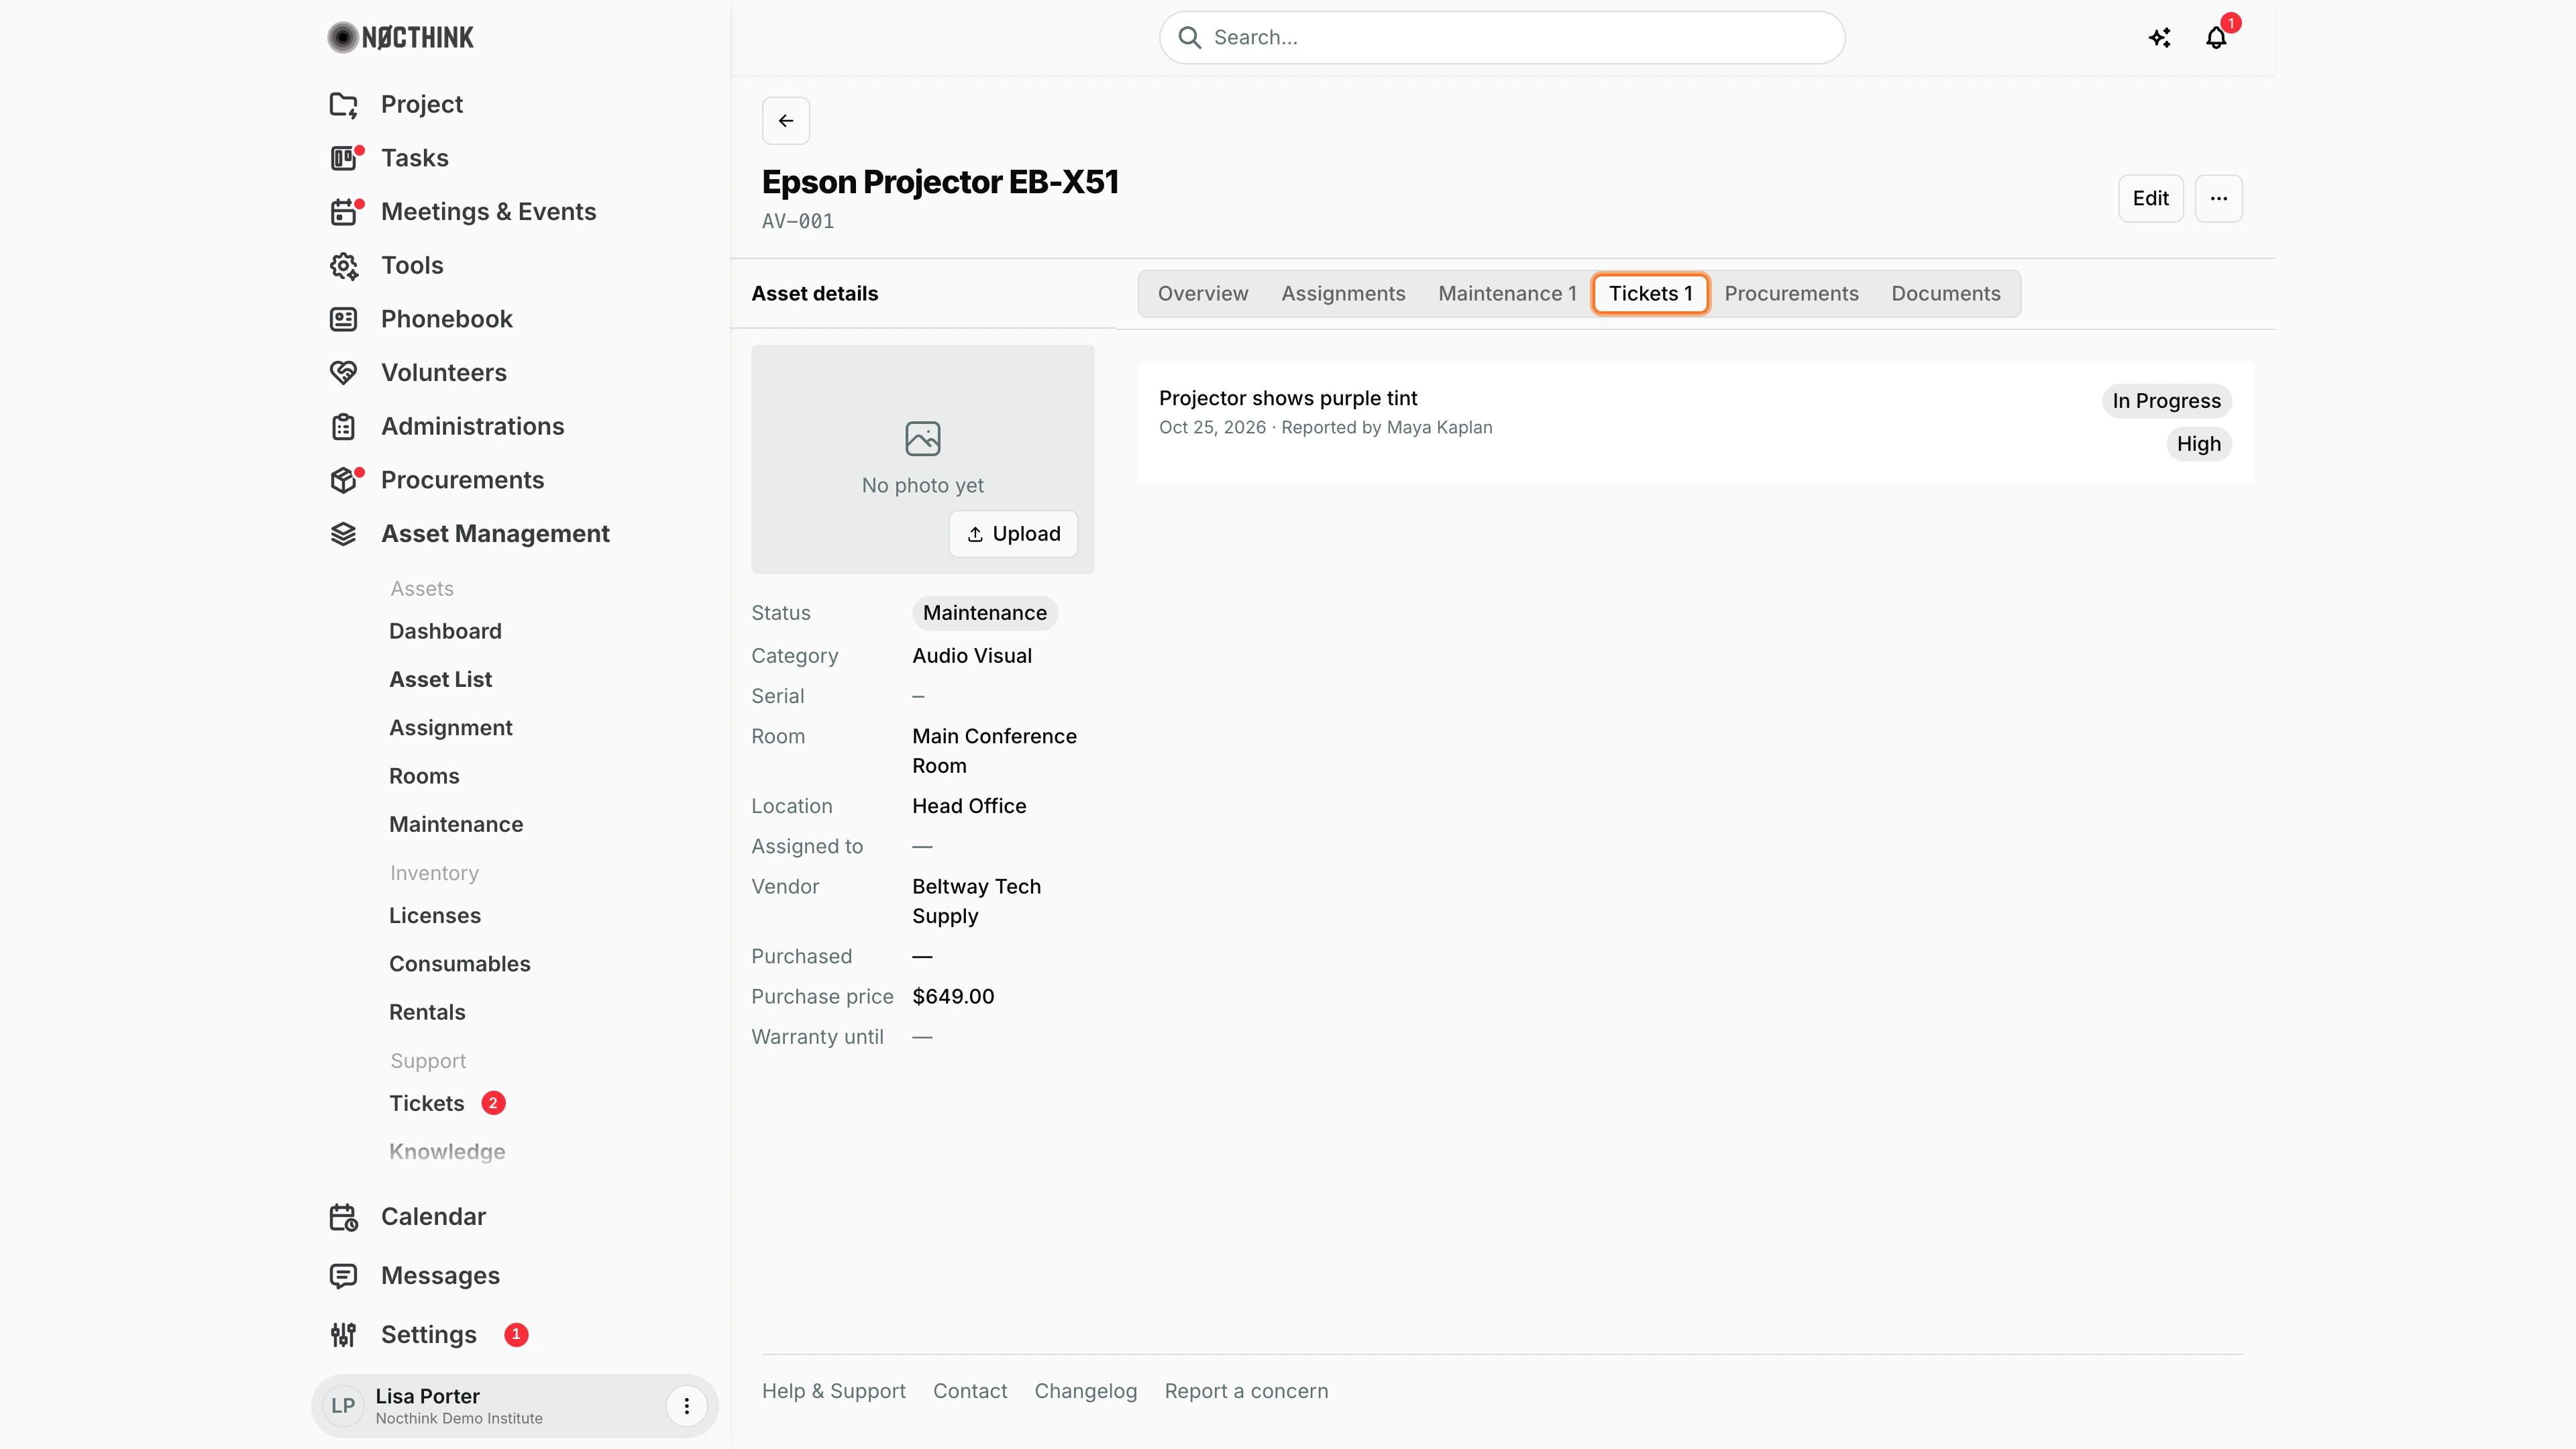
Screenshot: Lisa Porter (Operations Officer), Nocthink Demo Institute demo data.
The Tickets tab shows every helpdesk ticket raised about this asset, newest first: the title, the date, who reported it, the status (Open, In Progress, Resolved, Closed) and the priority. Here one ticket, "Projector shows purple tint", is In Progress with High priority.
I use this tab before deciding whether an asset needs a repair job or replacement: several tickets on the same asset are a sign it should go to Maintenance. Tickets themselves are raised and updated on Tickets. With none, the tab reads "No tickets yet".
Upload document
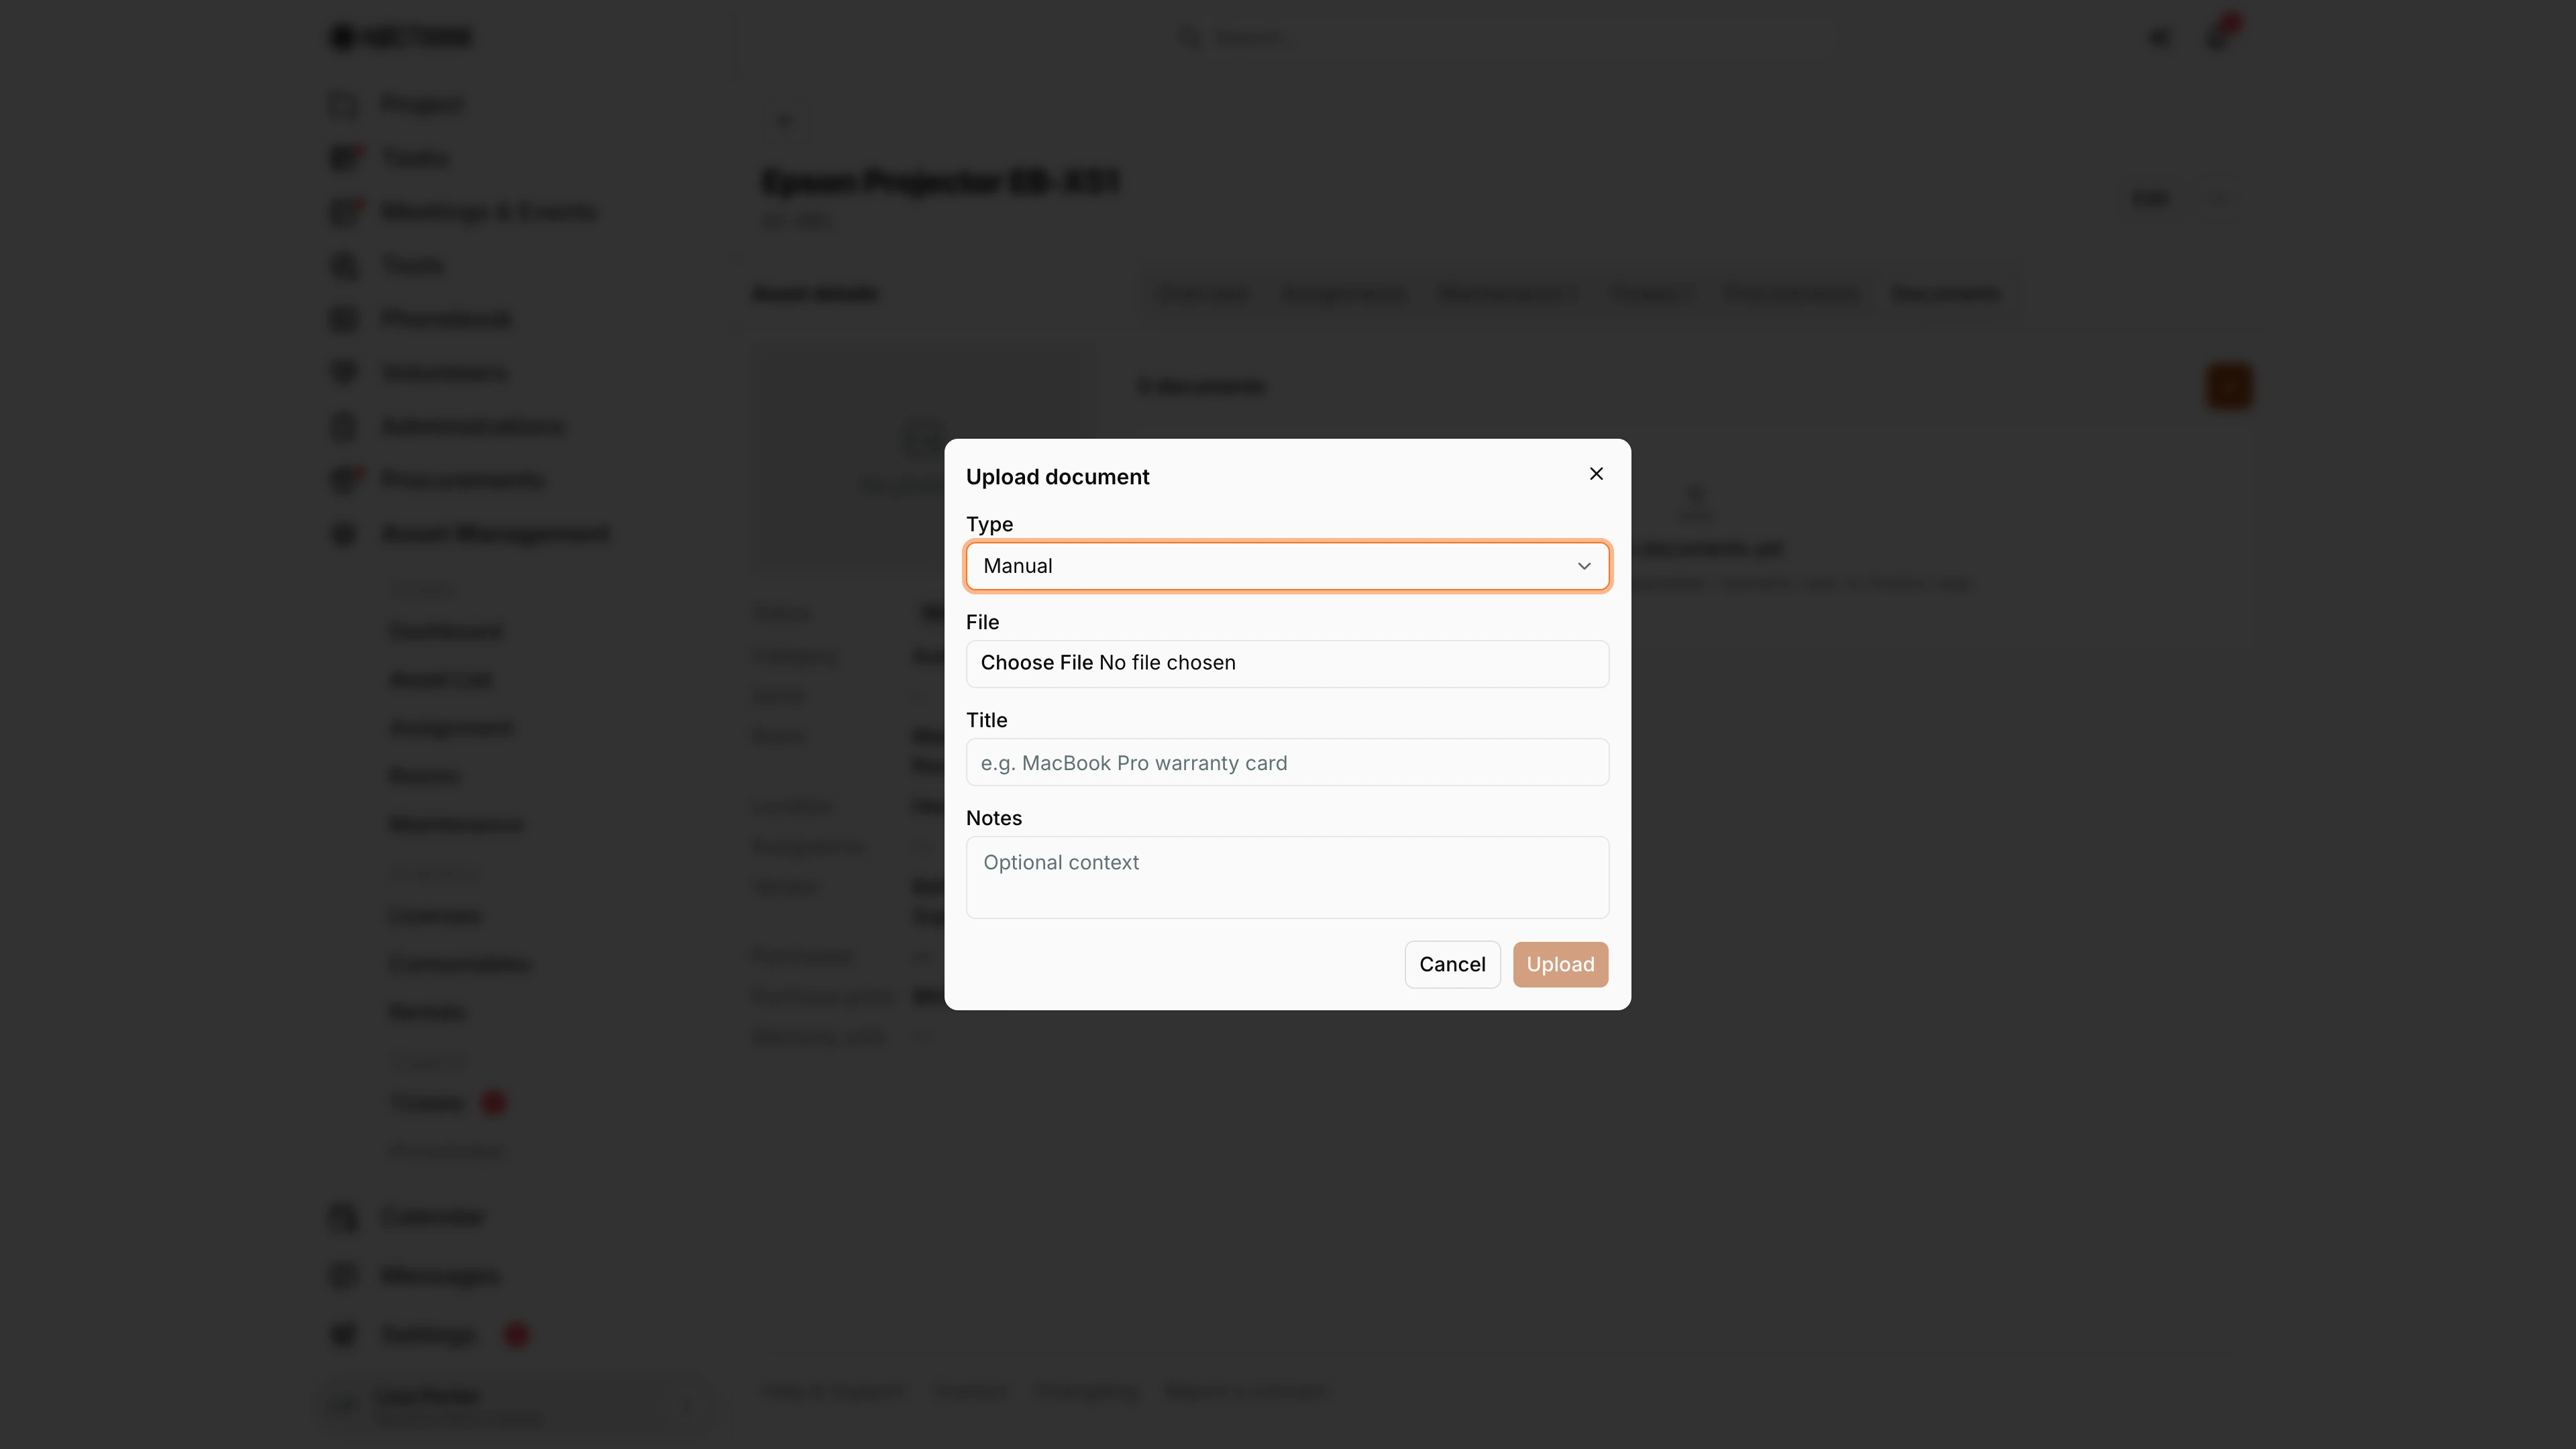
Screenshot: Lisa Porter (Operations Officer), Nocthink Demo Institute demo data.
The Documents tab keeps the paperwork for this asset: the user manual, the guarantee or warranty card, the invoice or receipt. It shows "n documents" and an orange + (Upload document); with nothing uploaded it reads "No documents yet — Upload the user manual, guarantee / warranty card, or invoice copy."
The Upload document dialog asks for Type (Manual, Guarantee / warranty card, Invoice, Receipt, Other), the File, a Title and optional Notes. The upload button stays disabled until a file is chosen. Each uploaded document appears in the tab with its type and can be downloaded or deleted (delete asks "Delete "<title>"?").
Generate QR code
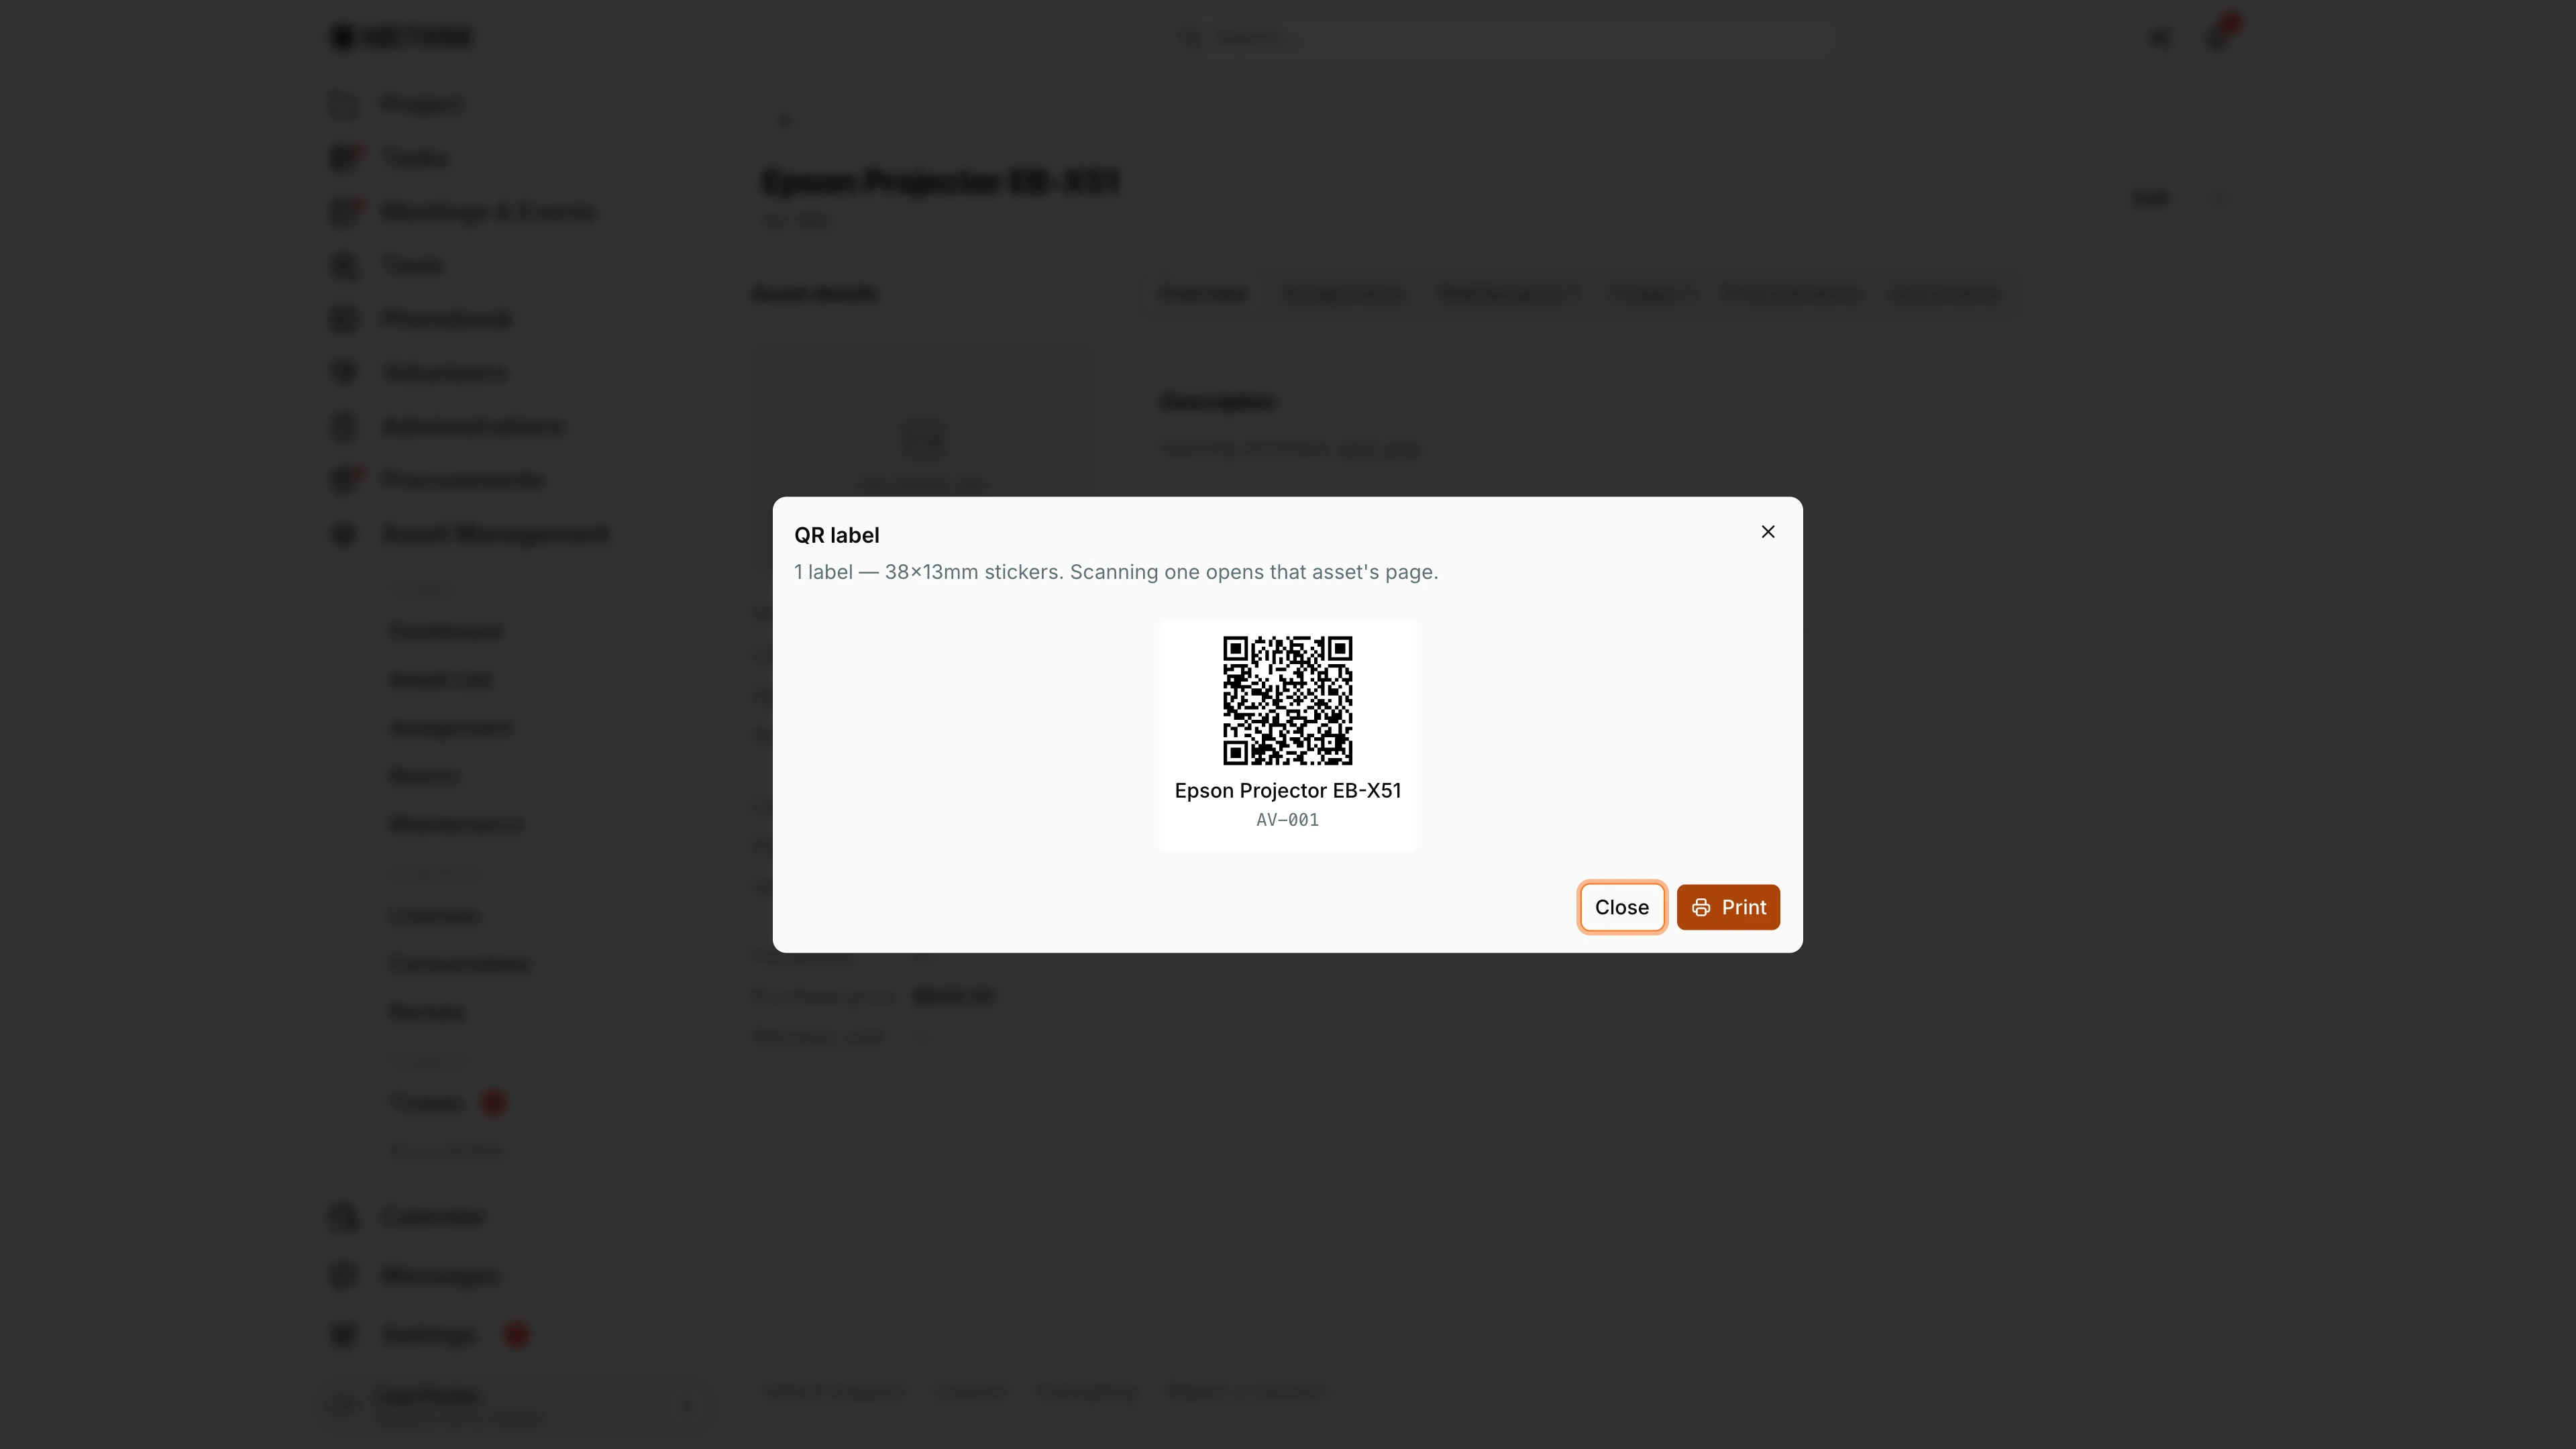
Screenshot: Lisa Porter (Operations Officer), Nocthink Demo Institute demo data.
⋯ → Generate QR code on the asset page opens the QR label dialog for this one asset: "1 label — 38×13mm stickers. Scanning one opens that asset's page." The label shows the QR code, the asset name and the asset tag.
Print opens the browser print dialog with the label laid out for sticker sheets; Close dismisses it. To print labels for many assets at once I tick them on the list and use Generate QR (n) instead (see "How I print QR labels").
New asset
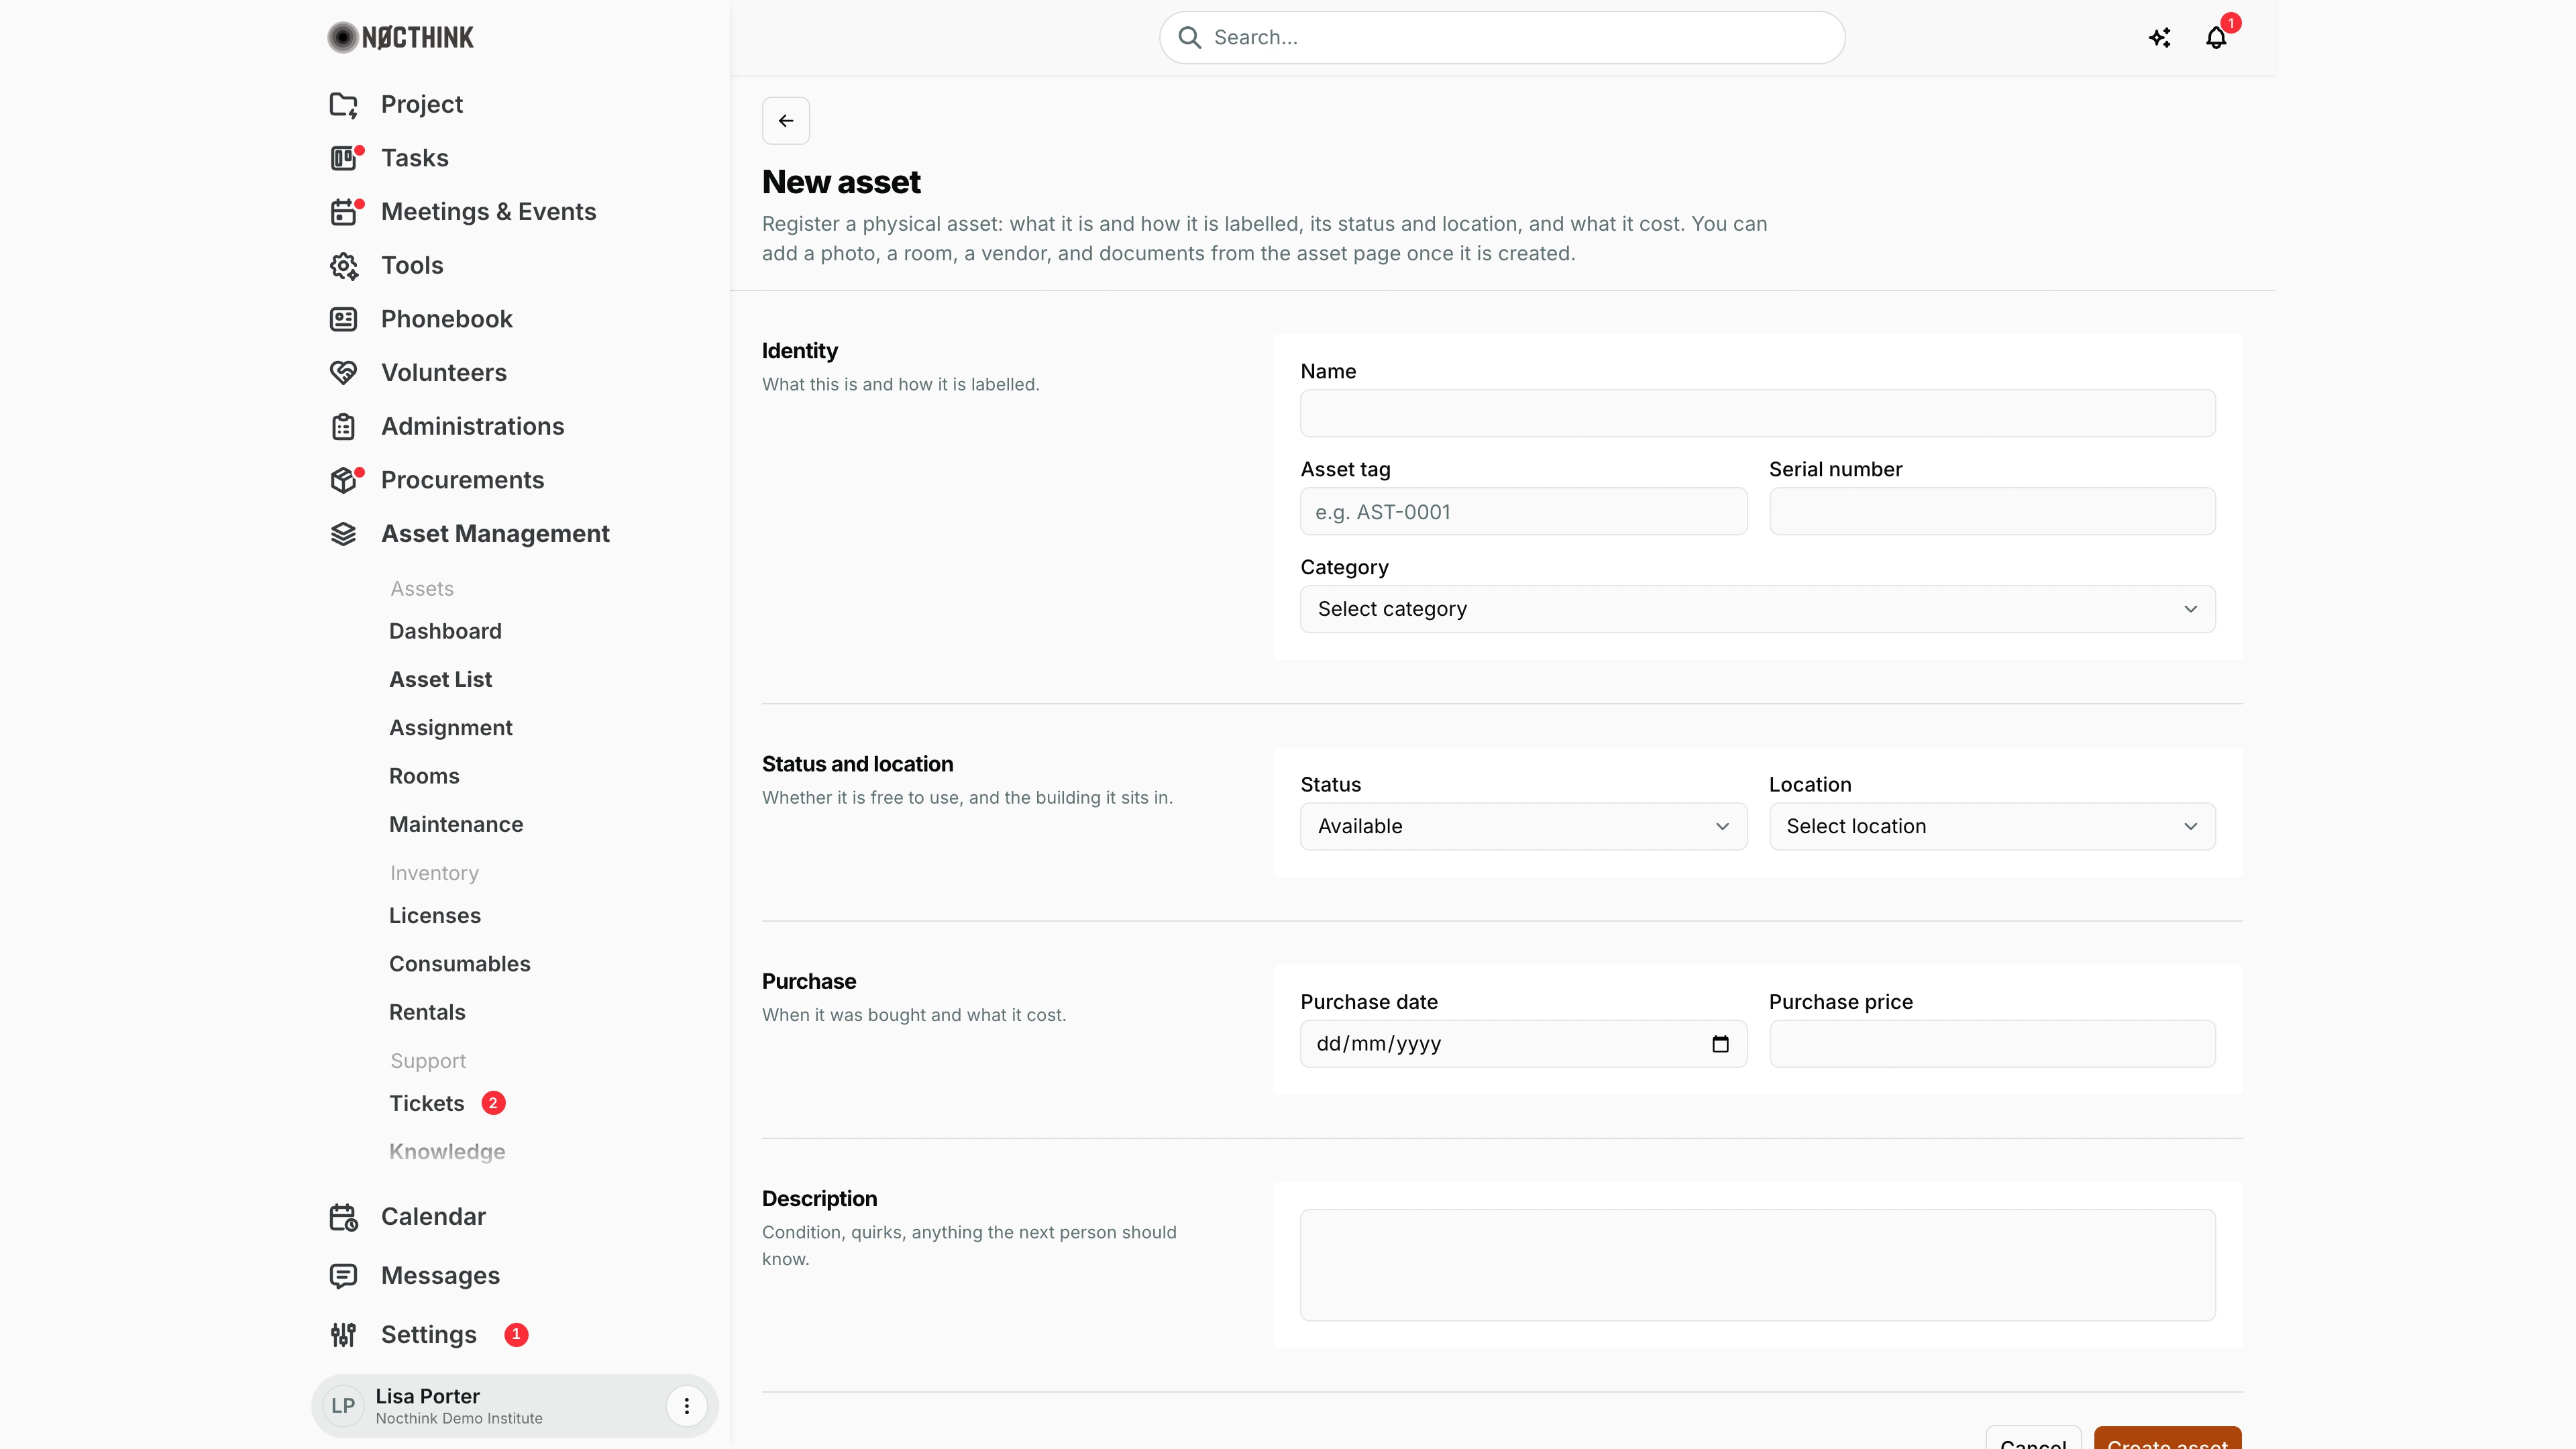
Screenshot: Lisa Porter (Operations Officer), Nocthink Demo Institute demo data.
The + button on the list opens the New asset page: "Register a physical asset: what it is and how it is labelled, its status and location, and what it cost. You can add a photo, a room, a vendor, and documents from the asset page once it is created."
The form has four sections: Identity (Name, Asset tag with the hint "e.g. AST-0001", Serial number, Category), Status and location (Status, defaulting to Available, and Location), Purchase (Purchase date, Purchase price) and Description. Create asset saves it and Cancel goes back. The room, vendor, warranty date and photo are only on the edit form.
Edit asset
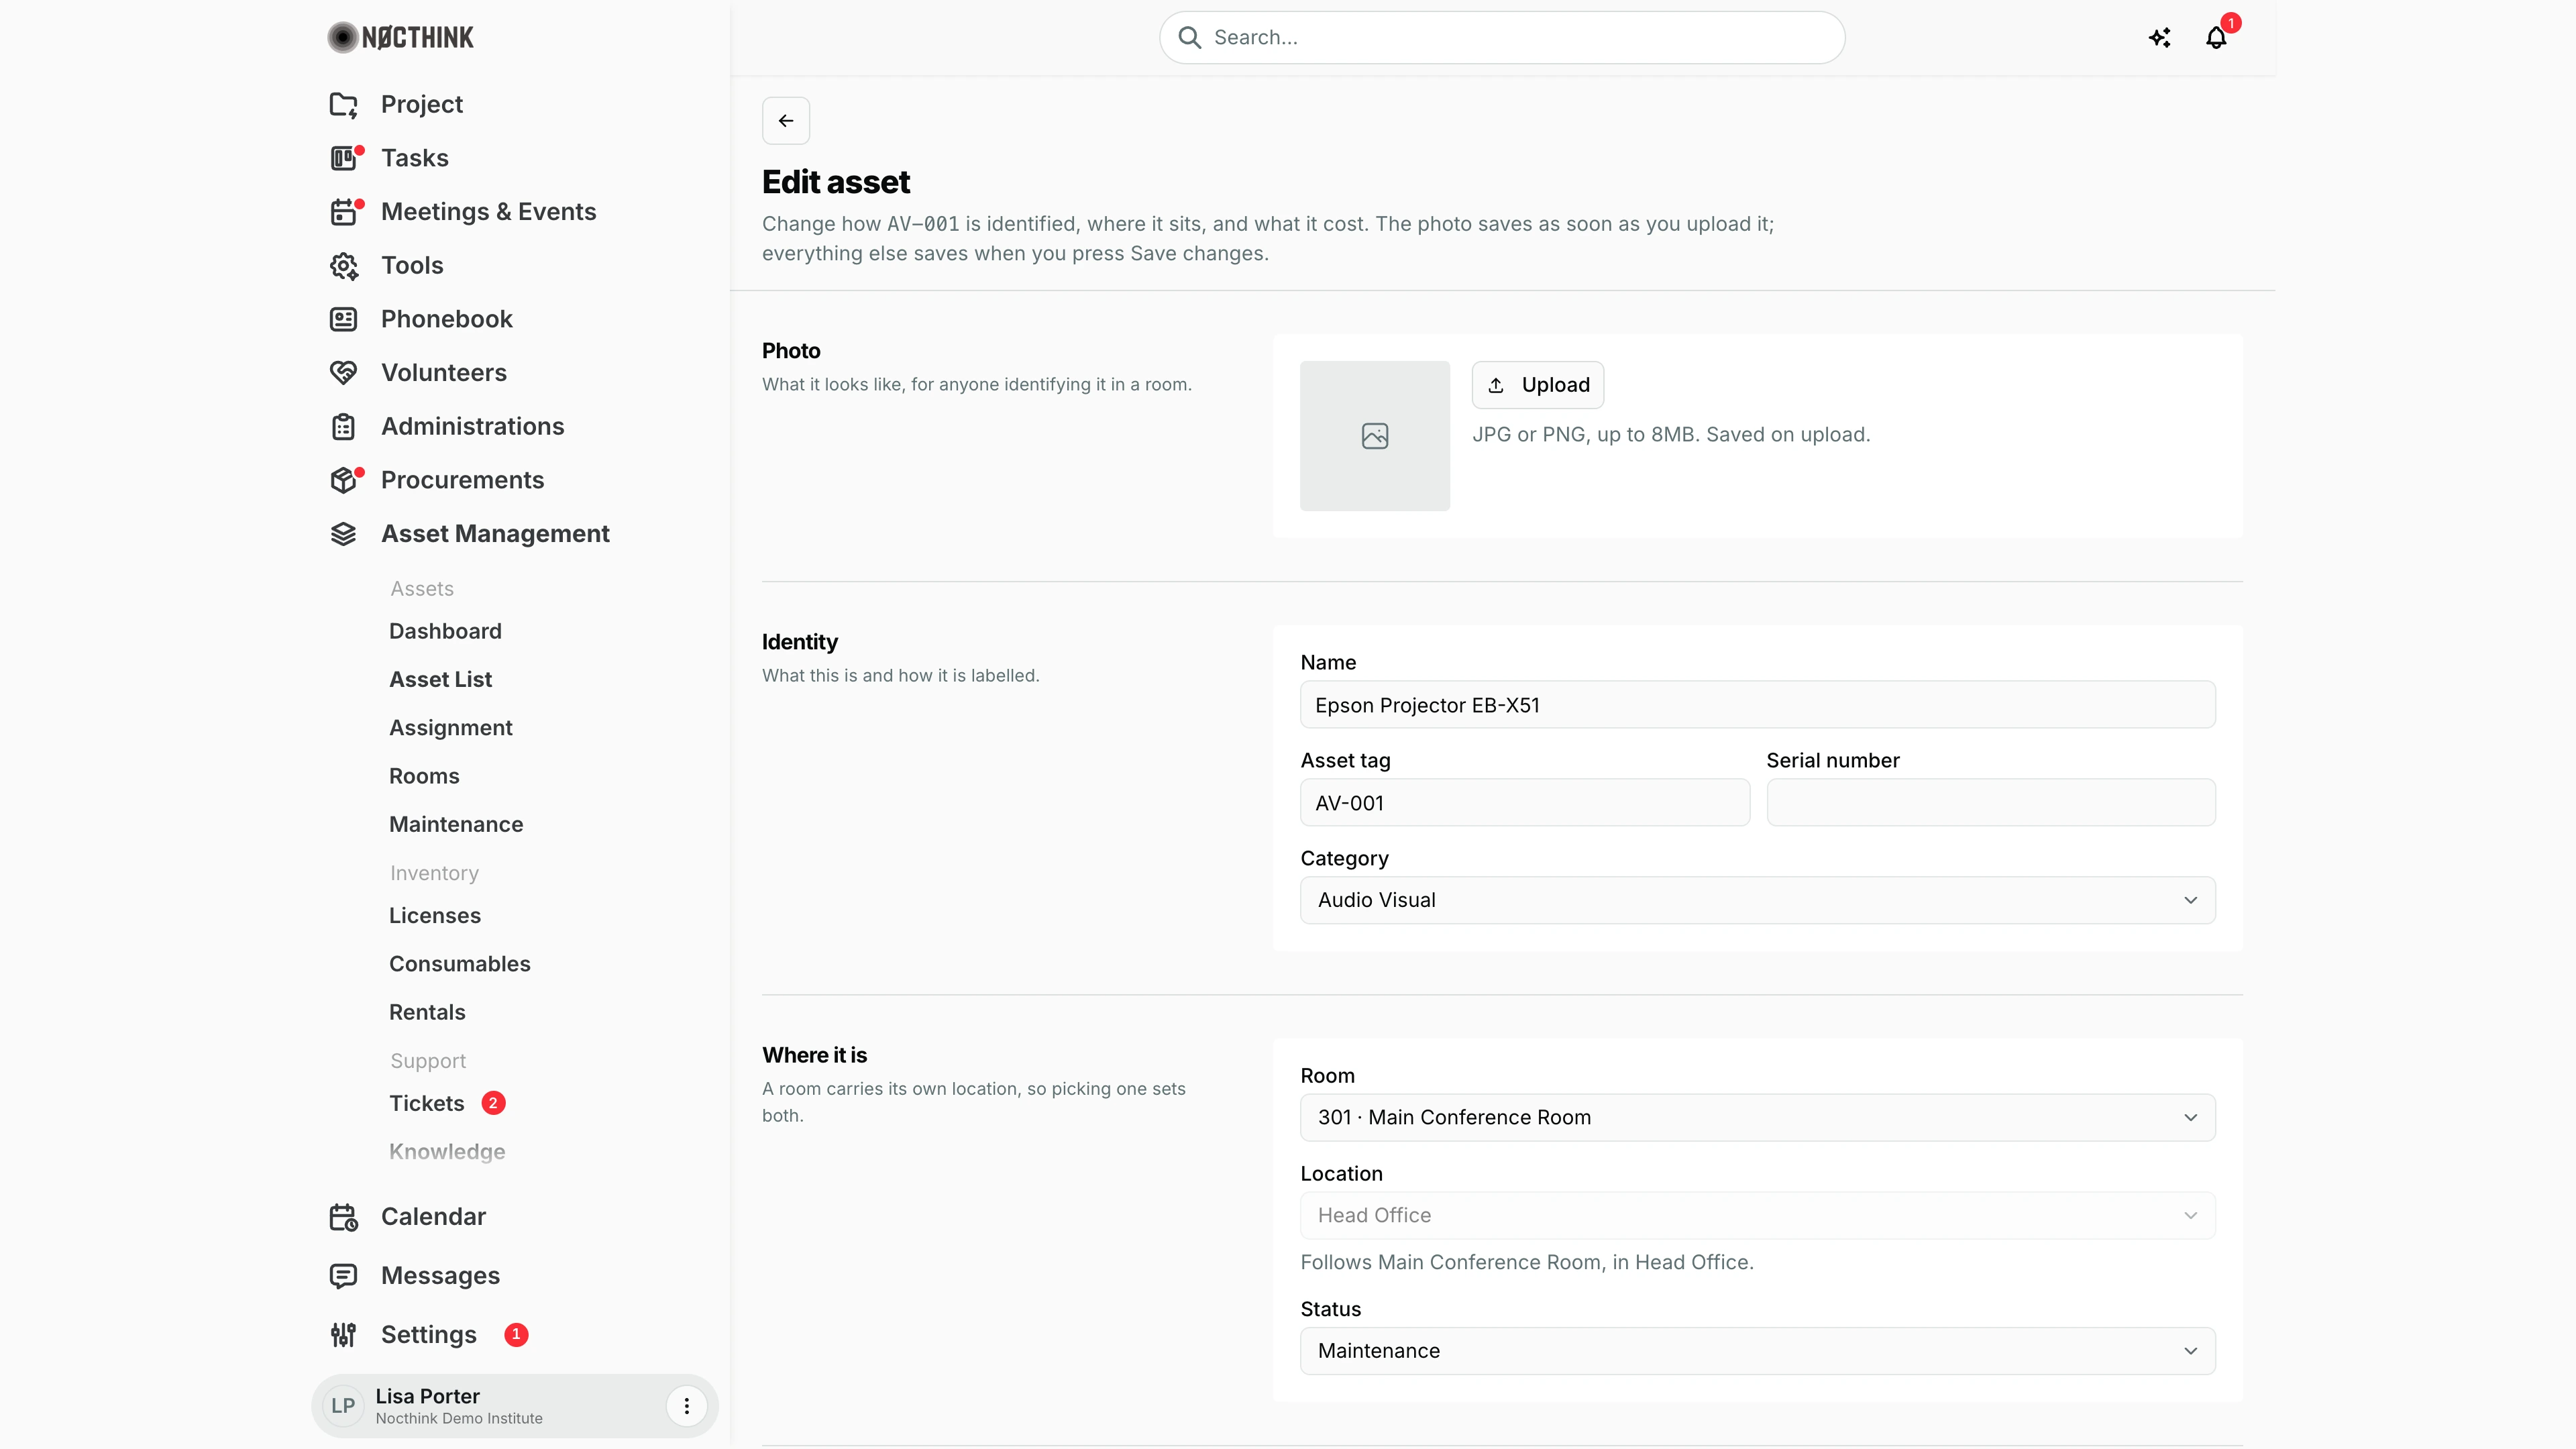
Screenshot: Lisa Porter (Operations Officer), Nocthink Demo Institute demo data.
Edit on the asset page (or ⋯ → Edit on the list) opens Edit asset. It has more than the new-asset form: Photo (upload or replace; saves immediately), Identity (Name, Asset tag, Serial number, Category), Where it is (Room, Location, Status; "A room carries its own location, so picking one sets both."), Purchase (Vendor, Purchased, Price, Warranty until) and Description.
Save changes stores everything except the photo; Cancel discards. Changing Status here is how an asset is taken out of service for repairs or marked Retired or Lost.
Access & permissions
- Visible to anyone with
asset_management.view(Asset Officer, Owner/Director, Procurement, General Affairs, finance roles per docs/role.md). Ordinary staff do not get Asset List in the target matrix; a personal "My assets" page is proposed but not built. - Creating needs
asset_management.create, editingupdate, deletingdelete. Procurement can create/update; read-only roles get a server error on save. - Finance authority is treated as having write access to the asset domain by the server.
Caveats
- Deleting is permanent and cascades. Removing an asset also deletes its assignment history, maintenance records, documents, and audit records; linked tickets stay but lose the asset link. Both the single-row delete and Delete (n) in bulk ask for confirmation and spell this out first.
- Asset tag must be unique within the organization. Serial number is required on the New asset form even for items without one (enter something like "N/A").
- Setting Status to Assigned on the form does not create a custodian; use Assignment to record who holds it. Assigning and returning keep the status in sync automatically, but they never override Maintenance, Retired, or Lost.
- Moving a room to another site (on the Rooms page) moves all its assets' locations too.
- Amounts are shown in the organization's base currency.
- The Room filter only lists active rooms; assets in archived rooms still show their room name but cannot be filtered by it.
Limitations
- No export (CSV/Excel) and no import.
- Search matches the name in the table; tag and serial are not matched by the table search box.
- No depreciation schedule on this page; category depreciation rates are only stored in Settings → Asset Management.
- No bulk edit (status, room) — only bulk QR and bulk delete.
- Room, photo, vendor, and warranty cannot be set on the New asset form; only on Edit.
- Specifications are shown on the Overview tab but cannot be entered or edited anywhere in the UI.
Related menus
- Dashboard — summary of this register.
- Assignment — record who holds each asset.
- Rooms — rooms the assets sit in.
- Maintenance — service history shown on each asset's Maintenance tab.
- Tickets — problem reports linked to an asset.
- Audit — physical checks recorded against an asset.
- Goods Receipts — where received equipment comes from; linked documents show on the asset's Procurements tab.